How to Hide Cables on a Desk: 10 Clean Cable Management Solutions
Build a clean, serviceable desk cable system with an under-desk tray, safe power routing and ten practical solutions for fixed or standing desks.
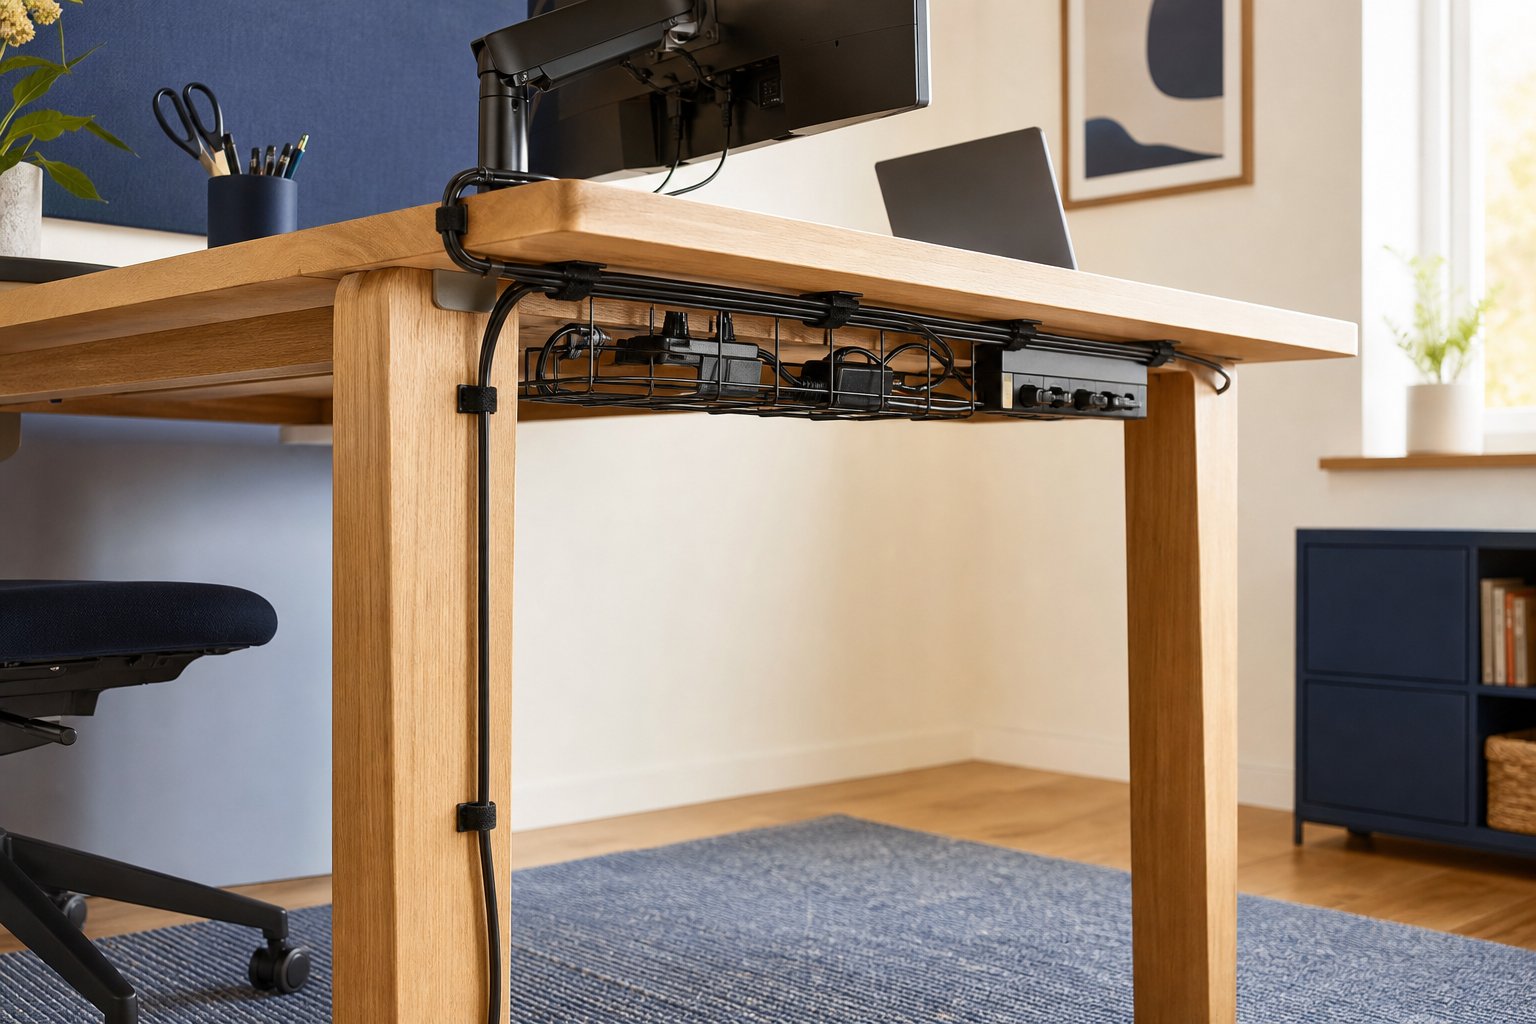
What to know first
- Start with the work you do, not the look you want.
- Protect clearances before choosing furniture.
- Spend first on items you touch for hours each day.
Good desk cable management does more than hide wires. It keeps plugs supported, protects connectors from being pulled, makes equipment easier to replace and prevents chair wheels or moving desk parts from catching a cable.
The cleanest system is rarely the one with the most accessories. It uses one safe power route, one data route and enough slack for normal movement. This guide shows you how to plan that system, then choose from ten practical solutions that work on fixed desks, standing desks and rented spaces.
Start with a cable audit
Unplugging everything before you have a plan creates unnecessary confusion. First, photograph the current connections from two angles. Then make a quick list.
| Device | Power source | Data connection | Must move? |
|---|---|---|---|
| Laptop | USB-C charger or dock | Dock, Wi-Fi or Ethernet | Often |
| Monitor | AC power | HDMI, DisplayPort or USB-C | Rarely |
| Desk lamp | AC or USB | None | Sometimes |
| Keyboard and mouse | USB or wireless | Receiver, Bluetooth or cable | Yes |
| Speakers | AC or USB | Audio, USB or Bluetooth | Rarely |
Label both ends of any cable that is hard to identify. Masking tape works during planning; printed or write-on labels are better once the arrangement is stable.
Do not bundle every wire together. Power, display and network cables have different destinations, and keeping routes understandable makes troubleshooting much easier.
Choose the desk’s anchor point
Every cable system needs one main anchor: the place where fixed connections live. On most desks, that should be an under-desk cable tray holding the surge protector, power bricks and excess cable length.
Place the tray where you can reach it without removing the monitor or crawling behind permanent furniture. Leave ventilation around power adapters. If the desk has a crossbar, motor or control box, confirm the tray and its screws will not interfere.
For a fixed desk, the anchor can sit near the wall. For a height-adjustable desk, mount the anchor to the moving desktop so the computer, monitors and accessories travel together. Ideally, only one adequately long power cable and any required network cable should bridge from the moving desk to the room.
1. Install an under-desk cable tray
A tray is the highest-impact cable management upgrade for most home offices. It lifts the surge protector and bulky adapters off the floor while keeping them accessible.
Pick the right mounting style
- Screw-mounted trays are usually the strongest. Check desktop thickness before drilling.
- Clamp-on trays suit renters and desks you do not want to modify. Make sure clamps do not block your chair or drawers.
- Adhesive trays can hold light cables, but heat, dust and textured surfaces reduce adhesive reliability. Do not trust adhesive alone with a heavy power strip unless the product is designed and rated for that load.
- Wire baskets ventilate power bricks and make routes visible. Solid trays hide more but may trap heat.
Choose a tray longer than the surge protector so plugs, adapters and cable loops are not compressed into one crowded point.
2. Mount the power strip to the desk
Mounting a power strip keeps plugs from pulling on the wall outlet and allows a standing desk to move as one system. Use the manufacturer’s mounting holes, a purpose-built bracket or rated straps.
Do not cover ventilation slots, switches or overload indicators. Keep high-draw appliances such as portable heaters on an appropriate separate circuit rather than an office power strip. Use power equipment certified for your local electrical standard and never connect power strips in a chain.
Position the switch where it cannot be kicked accidentally but remains reachable in an emergency. Leave room to remove large plugs without disassembling the whole tray.
3. Use reusable hook-and-loop ties
Reusable ties are better than permanent plastic zip ties during setup. They can be opened when a monitor or laptop changes, and they are less likely to pinch a cable when used correctly.
Wrap cables loosely enough that they retain their normal shape. Create small groups by destination rather than one thick bundle:
- Monitor power and display
- Laptop or dock connections
- Input-device and charging cables
- The single run from the desk to the wall
Place a tie every 20 to 30 cm where needed, but do not aim for a rigid cable rod. A little flexibility makes the system easier to service.
4. Route cables along the desk frame
Desk legs and support rails create natural routes. Low-profile clips, magnetic channels on steel frames or reusable straps can guide cables along those lines.
Run the cable on the inside or back of a leg so it is not visible from the room and cannot meet a chair caster. Keep it away from sharp metal edges and moving joints.
On a standing desk, do a full movement test. Raise the desk to its highest position while watching every cable, then lower it completely. Nothing should become taut, scrape against a mechanism or form a loop where knees can catch it.
5. Add a vertical cable spine for a standing desk
A cable spine is a segmented channel that guides the final cable run from a moving desktop to the floor. It creates a controlled curve instead of leaving wires to hang freely.
A spine works best when only a few cables need to reach the room. Mount the surge protector and adapters under the desktop first. Then place the spine near the rear leg and verify that it bends without pushing the cable against a sharp edge.
If you do not want a spine, a flexible braided sleeve can work. Leave enough length for maximum desk height and anchor both ends so the sleeve does not slide into the chair path.
6. Use sleeves only on stable cable groups
Braided or fabric sleeves make multiple cables read as one visual line. They are useful behind a monitor stand or along the route to a computer tower.
Do not sleeve cables that you disconnect every day. A laptop charging cable, security key or memory-card reader should remain accessible. Avoid wrapping hot power adapters inside a sleeve.
Choose a sleeve that can reopen along its length. A split sleeve or wraparound design is easier to update than a narrow tube that requires every plug to pass through one end.
7. Create an accessible charging point
A tidy desk becomes frustrating when the charging cable falls behind it. Use a weighted cable holder, edge clip or magnetic holder compatible with the connector.
Place the charging point within easy reach but outside the primary mouse area. Give the cable a little extra length on the desk so plugging in a phone does not pull against the under-desk anchor.
For devices charged away from the desk, create a small charging shelf instead. Moving phones and headphones away from the work surface reduces both cable clutter and visual distraction.
8. Hide adapters in a ventilated cable box
A floor or desktop cable box can hide a surge protector where under-desk mounting is impossible. It is useful with glass desks, temporary tables and rental furniture.
Choose a box with multiple exits so cords do not bend sharply. Do not stack hot power bricks tightly or cover equipment that requires ventilation. A cable box should organize safe equipment; it should not turn an overloaded power setup into a hidden one.
Place it where cleaning is possible and spills are unlikely. A box on the floor should not sit in a walkway.
9. Shorten excess cable without tight coils
Excess length belongs near the device or tray, not hanging halfway to the floor. Form a loose oval or figure-eight and secure it with a reusable tie. Tight coils can stress conductors and make thick cables difficult to cool.
Short replacement cables can create the cleanest result, but verify the specification—not just the connector shape. USB-C cables, for example, vary in charging power and data or display capability. HDMI and DisplayPort cables also have performance requirements for high resolution and refresh rates.
Keep the original cable until the replacement has been tested through ordinary work.
10. Label the hidden connections
Labels are invisible in the finished room but save time every time something changes. Mark both ends of display, network and power cables with the device name.
Use simple names such as LEFT MONITOR POWER, DOCK TO DISPLAY and ROUTER. If several identical adapters live in the tray, label the power brick as well.
Take one final photograph of the completed tray. Store it with a note listing which wall outlet, surge protector and adapters are in use. That record makes future troubleshooting much faster.
Cable management for different desk types
Fixed desk against a wall
Use an under-desk tray near the back edge, then route one power cable down the inside of a rear leg. Leave enough wall clearance to reach plugs without pulling the desk over finished flooring.
Sit-stand desk
Attach the tray, power strip and dock to the moving desktop. Use a spine or flexible sleeve for the small number of cables that must reach the floor. Test at full height with the monitor arms extended.
Glass desk
Avoid drilling and be cautious with adhesive weight. Use clamp accessories designed for the desk edge, a floor cable box and a sleeve behind one leg. Never clamp in a location or with force the desk manufacturer does not permit.
Desk in the middle of a room
Use a floor-rated cord cover for any route across a walking surface, or have a qualified professional assess a safer power location. A loose extension cable across the room is not a cable-management solution.
A $30, $75 and $150 plan
| Budget | Start with | Add if needed |
|---|---|---|
| About $30 | Reusable ties, labels and edge clips | Use an existing safe tray or route along frame |
| About $75 | Under-desk tray and ties | Mount the existing surge protector |
| About $150 | Larger tray, rated power strip and standing-desk spine | Short verified data cables and charging holder |
You may need none of these exact amounts. Reuse safe equipment and buy only what supports the route you planned.
Common cable management mistakes
Optimizing for invisibility instead of service. You should be able to replace the laptop or monitor without cutting the whole system apart.
Using adhesive before cleaning and testing. Dust, texture and heat all weaken the bond. Use mechanical mounting for heavy equipment when the desk allows it.
Pulling cables tight. Connectors should not carry the weight of hanging wires.
Mixing every cable into one bundle. Separate groups are easier to understand and update.
Ignoring the desk’s motion. Standing desks, drawers and monitor arms all change cable length during use.
The 30-minute setup sequence
- Photograph and label the existing connections.
- Choose the under-desk anchor location.
- Mount the tray and power strip safely.
- Connect equipment and create loose service loops.
- Group cables by destination with reusable ties.
- Route the final wall connection down one leg or through a spine.
- Test desk movement, chair clearance and access to every plug.
- Wait one week before adding permanent clips.
The goal is not to erase every wire. It is to create a small, understandable system where cables are supported, moving parts remain clear and the next equipment change takes minutes instead of an afternoon.