Keyboard Tray Guide: Do You Need One for Your Desk?
Learn when a keyboard tray improves desk ergonomics, how to measure clearance and range, and which tilt, mouse-platform and installation features matter most.
What to know first
- Start with the work you do, not the look you want.
- Protect clearances before choosing furniture.
- Spend first on items you touch for hours each day.
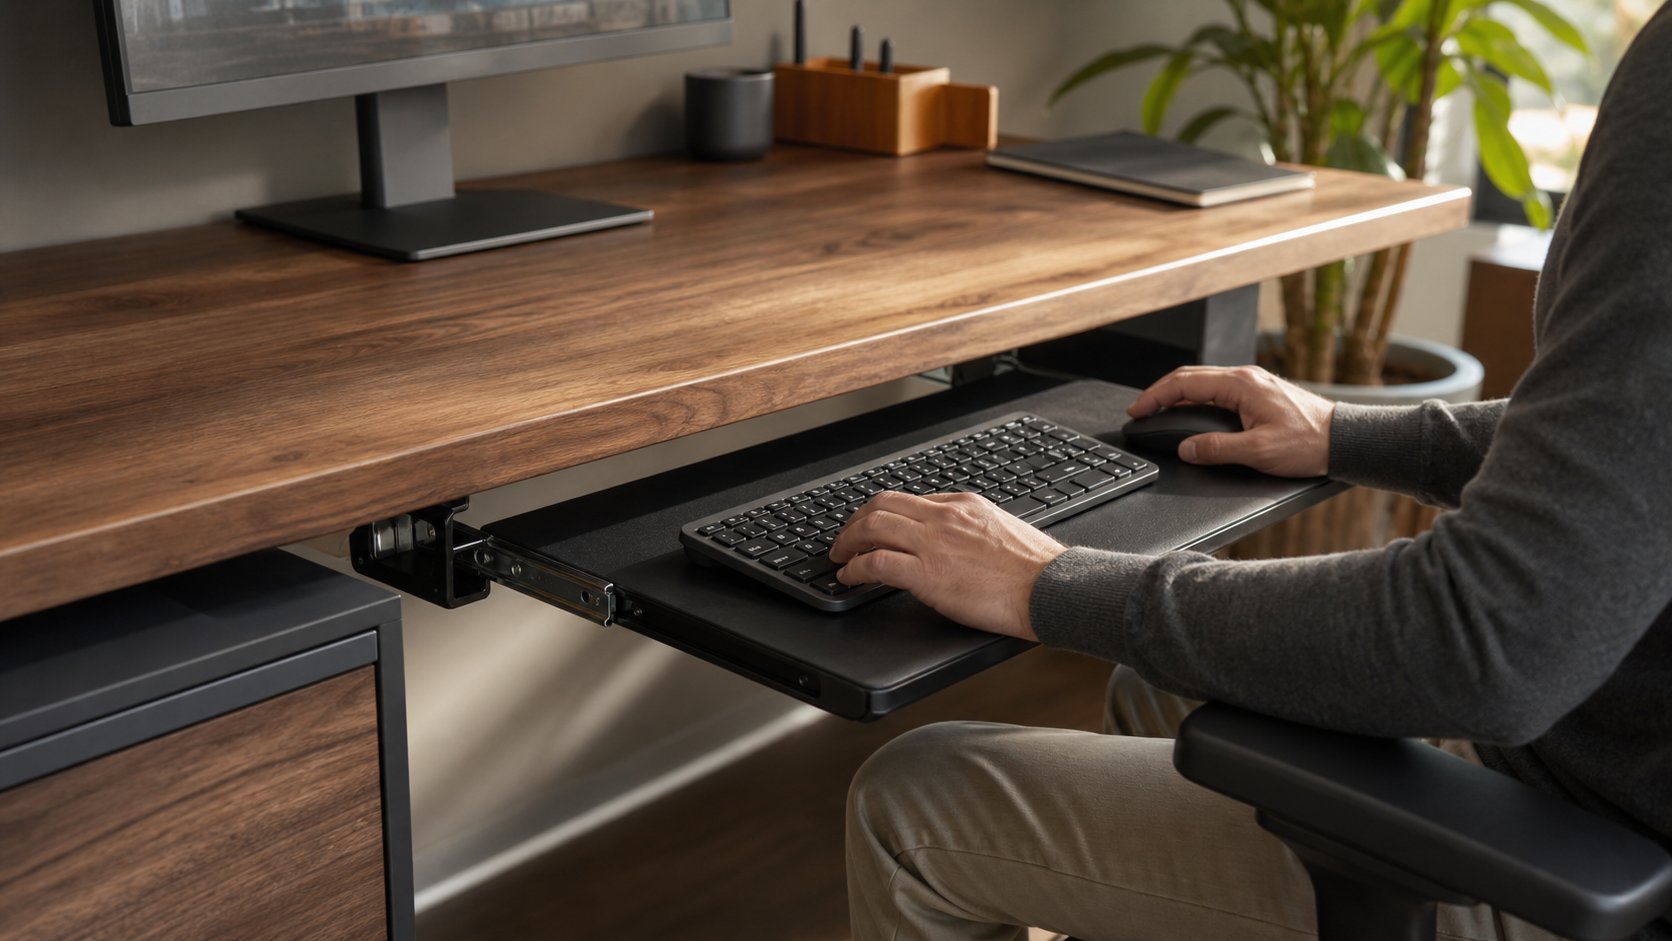
A keyboard tray is useful when a fixed desk places the keyboard too high, the desktop lacks depth or several people need different input heights. It is unnecessary when the desk surface already keeps your shoulders relaxed, elbows near your sides and mouse close to the keyboard.
Measure knee clearance, mounting depth, keyboard width and required height before buying. The tray must support the mouse on the same level and retract without hitting crossbars, drawers or chair arms.
Quick decision table
| Situation | Is a tray likely to help? |
|---|---|
| Desktop is above comfortable elbow height | Yes, if the tray can lower the keys enough |
| Desk is already height-adjustable | Usually not |
| Monitor base leaves little keyboard depth | Possibly |
| Mouse would sit on the desk above the tray | No; that creates uneven input heights |
| Desk has a front crossbar or drawer | Only after checking mounting clearance |
| User alternates frequently | An adjustable arm can help |
| Tray would reduce knee room | Probably not |
| Laptop is used without external input devices | Add keyboard and mouse first |
A tray is a fit tool, not an automatic ergonomic upgrade.
Start with keyboard height
Sit with feet supported and shoulders relaxed. Let the upper arms hang naturally. Bend the elbows so the forearms are approximately level or slope slightly downward toward the keys.
The key surface—not the underside of the tray—should meet that position. A thick mechanical keyboard raises the keys several centimeters above the platform.
If the desktop is comfortable already, a tray may lower the keyboard too far. If the desktop is high, measure the distance from its underside to your target key height.
OSHA’s computer workstation purchasing guidance says a keyboard tray should be large enough for the keyboard and pointing device, adjust easily and lock securely.
What a keyboard tray can solve
A desk that is too high
Many fixed desks are built to a conventional furniture height, not an individual’s seated elbow height. A shorter user may raise the chair to reach the keyboard and then lose foot support.
A tray can lower the input surface while leaving the monitor on the desktop. A footrest may still be needed when chair height is set for other reasons.
Insufficient desk depth
A retractable tray can move the keyboard closer to the body and free space for monitor distance. It does not create more room under a shallow desk, and the extended tray increases the overall room footprint.
Shared workstations
An articulated tray can accommodate several seated users more easily than a fixed surface. Each user still needs a suitable chair and screen position.
Limited mouse reach
A wide tray or attached mouse platform can keep the pointer beside the keyboard. This works only when the platform is stable and level enough for accurate movement.
What a tray cannot solve
A keyboard tray does not fix:
- A chair that does not fit
- Unsupported feet
- A monitor positioned too high or far away
- Excessive laptop use without external input devices
- Long uninterrupted work
- Pain requiring clinical assessment
- A desk with inadequate structural strength
Use the seven free desk adjustments before adding hardware.
Measure the mounting area
Look under the desk with a light. Record:
- Clear front-to-back depth
- Distance between drawers or supports
- Desktop thickness
- Crossbar position
- Apron depth
- Cable-tray location
- Sit-stand frame parts
- Screw-safe zones specified by the manufacturer
An arm mechanism may require 45–60 cm of unobstructed depth even when the platform is smaller.
Do not drill into glass, stone, a hollow-core top or a surface with embedded wiring unless the desk and tray manufacturers explicitly approve the installation method.
Measure the keyboard and mouse
Measure the keyboard’s full width and depth, including permanently attached palm support and cable exit. Add usable mouse area.
A full-size keyboard can force the mouse far to the side. Consider:
- A tenkeyless keyboard
- A compact layout
- A separate number pad used only when needed
- A central pointing device
OSHA’s pointer guidance recommends keeping the mouse close and on the same plane as the keyboard.
Choose the adjustment mechanism
Fixed-height tray
A simple sliding platform mounts directly under the desktop.
Best for: one user whose target height is known.
Advantages: lower cost and fewer moving parts.
Limitations: no fine height or angle adjustment.
Articulating arm
An arm changes height, tilt and sometimes side position.
Best for: shared desks or uncertain fit.
Advantages: broad adjustment and easy repositioning.
Limitations: higher cost, deeper mounting requirement and possible movement while typing.
Clamp-on tray
A bracket clamps to the desktop edge without drilling.
Best for: compatible solid desks where permanent installation is not allowed.
Advantages: reversible installation.
Limitations: visible clamps, limited drawer clearance and concentrated edge load.
Chair-mounted platform
The input devices move with the chair.
Best for: specialized accessibility assessments.
Limitations: difficult entry, cable routing and compatibility. Seek professional guidance where needed.
Tilt: flat or slightly negative
A negative tilt angles the front edge slightly higher than the back, allowing the hands to follow a neutral forearm line. Positive tilt—the back edge raised by keyboard feet—can increase wrist extension for some users.
Start flat. If the tray supports negative tilt, adjust by a small amount and evaluate.
Do not use steep tilt as a substitute for setting the correct height.
Palm support and front edge
A broad, softly finished front support can reduce contact with a hard edge during pauses. It should support the heel of the hand rather than force pressure under the wrist while typing.
Check that:
- The edge is not sharp
- The pad does not raise the wrists above the keys
- Adhesive or upholstery can be replaced
- The platform remains deep enough
A detachable support is easier to clean.
Knee and thigh clearance
A tray consumes space under the desk. Test the lowest and retracted positions.
You should be able to:
- Sit centered
- Change leg position
- Enter and leave without contact
- Use the chair recline
- Clear the mechanism with knees and thighs
- Move the chair arms under or beside the platform as intended
A low tray that repeatedly hits the legs is not a workable fit.
Stability and load rating
Typing force reveals movement quickly. Look for:
- Published platform load rating
- Minimal side-to-side play
- A lock that holds height and tilt
- Rails that extend smoothly
- Hardware suited to desktop material
- Replacement parts
- A meaningful warranty
Do not lean body weight on the tray. It is an input platform, not a support rail.
Installation checklist
- Remove equipment from the desk.
- Unplug power before drilling or working around cables.
- Locate all crossbars, drawers and wiring.
- Mark the desk center and mechanism footprint.
- Use the manufacturer’s template and fasteners.
- Drill only to the specified depth.
- Tighten evenly without crushing the desktop.
- Test movement before placing equipment.
- Route cables with service slack.
- Recheck fasteners after the initial use period.
Hire a qualified installer if the desk material, electrical components or mounting method is uncertain.
Cable management
Keyboard and mouse cables must accommodate full tray travel.
- Leave a controlled loop near the moving platform.
- Secure the cable before it reaches the computer port.
- Keep it outside slide rails and pivot joints.
- Test extension, retraction, height and tilt slowly.
- Use wireless devices only if charging and security suit the workplace.
A cable caught in the arm can damage the connector or stop the tray from locking.
Sit-stand desk compatibility
Most height-adjustable desks do not need an adjustable keyboard tray because the whole desktop can move to elbow height.
A tray may still help when:
- The desktop cannot go low enough while seated.
- A thick desktop raises the keys.
- Monitor equipment needs a different surface height.
- An accessibility assessment calls for separate input adjustment.
The tray also lowers the standing key range. Confirm the desk can raise high enough with the tray installed.
Use the standing-desk height calculator for an initial range.
Troubleshooting
Tray feels too low
Raise the mechanism or chair as appropriate. Account for the top of the keycaps, not only the tray.
Shoulders rise
Lower the key surface and check armrests.
Mouse shoulder reaches outward
Move the pointer closer, use a compact keyboard or choose a wider platform.
Tray bounces
Check installation and locks. Do not exceed its rating. Persistent movement may be a design limitation.
Knees hit the arm
Repositioning may not recover enough clearance. Remove or replace the tray if it obstructs safe sitting.
Monitor now feels too high
Adjust the screen independently. Do not raise the keyboard to match the monitor.
Common buying mistakes
Choosing by platform width alone. The mounting arm needs depth.
Putting the mouse on the desktop. Input devices should stay close and level.
Ignoring desktop material. Not every top accepts screws or clamps.
Buying the thickest model. Thickness reduces leg space.
Expecting one setting for everyone. Shared users need simple adjustment.
Installing before testing chair position. Armrests and recline can conflict.
Final recommendation
Buy a keyboard tray when measurements show that the desk places the keys too high or too far away. Choose a platform wide enough for keyboard and mouse, with secure height and tilt adjustment and enough room beneath it for your legs.
Skip the tray when the desktop already fits. The simplest correct surface is usually more stable than adding a mechanism that solves no measured problem.